---
title: 使用python控制windows鼠标和键盘
abbrlink: 2426edfc
cover: 'https://static.zahui.fan/images/202211041307268.jpg'
categories:
- Windows
tags:
- Script
- Automatic
date: 2021-11-02 11:57:01
---
> `python`在`windows`下操作键盘鼠标(有点类似于按键精灵),可以使用`PyUserInput`模块,`PyUserInput`依赖`pywin32`和`pyHook`模块。
> `pyautogui`感觉很不错,可以实现`PyUserInput`的所有功能,并且可以根据提供的截图来进行图像识别。
## PyUserInput
### 安装PyUserInput
PyUserInput模块安装前需要安装pywin32和pyHook模块
`pip install pywin32`
pyHook模块可从这里下载,需要下载对应版本的whl文件
安装: `pip install xxx.whl`
PyUserInput模块
官网:
> 这个模块官方已经不维护了,目前来看`python`3.7+`win11`还可以用,后续有需要的同学可以看看[Pynput](https://github.com/moses-palmer/pynput)
### 使用PyUserInput
```python
from pymouse import *
from pykeyboard import PyKeyboard
# 分别定义一个实例
m = PyMouse()
k = PyKeyboard()
# 鼠标操作:
# x,y 坐标位置
# button 1表示左键,2表示点击右键
# n 点击次数,默认是1次,2表示双击
m.click(x,y,button,n)
m.move(x,y) # 鼠标移动到坐标(x,y)
# 获得屏幕尺寸
x_dim, y_dim = m.screen_size()
# 键盘操作:
k.type_string(‘Hello, World!’) # 模拟键盘输入字符串
k.press_key(‘H’) # 模拟键盘按H键
k.release_key(‘H’) # 模拟键盘松开H键
k.tap_key(“H”) # 模拟点击H键
k.tap_key(‘H’,n=2,interval=5) # 模拟点击H键,2次,每次间隔5秒
k.tap_key(k.function_keys[5]) # 点击功能键F5
k.tap_key(k.numpad_keys[5],3) # 点击小键盘5,3次
k.press_keys([k.windows_l_key,'r']) # 按下 WIN + R
k.control_key # Ctrl 按键
k.alt_key # Alt 键
k.tab_key # Tab 键
# 示例,完成点击屏幕中央并键入“Hello, World!”的功能:
x_dim, y_dim = m.screen_size()
m.click(x_dim//2, y_dim//2, 1)
k.type_string('Hello, World!')
```
## pyautogui
官网文档:
官方支持windows、mac、linux。
### 安装pyautogui
```bash
pip install pyautogui opencv-python
```
### 使用示例
```python
import pyautogui
pyautogui.FAILSAFE = True # 出现故障,鼠标移动到左上角可以退出程序
pyautogui.PAUSE = 0.3 # 每一步的等待时间
screenWidth, screenHeight = pyautogui.size() # 获取主显示器尺寸
currentMouseX, currentMouseY = pyautogui.position() # 获取鼠标当前位置
pyautogui.moveTo(100, 150) # 鼠标移动到指定坐标
pyautogui.click() # 点击鼠标左键
pyautogui.click(100, 200) # 点击指定坐标
pyautogui.click('button.png') # 点击指定图片
pyautogui.move(400, 0) # 鼠标相对移动
pyautogui.doubleClick() # 双击
pyautogui.moveTo(500, 500, duration=2, tween=pyautogui.easeInOutQuad) # Use tweening/easing function to move mouse over 2 seconds.
pyautogui.write('Hello world!', interval=0.25) # type with quarter-second pause in between each key
pyautogui.press('esc') # Press the Esc key. All key names are in pyautogui.KEY_NAMES
with pyautogui.hold('shift'): # Press the Shift key down and hold it.
pyautogui.press(['left', 'left', 'left', 'left']) # Press the left arrow key 4 times.
# Shift key is released automatically.
pyautogui.hotkey('ctrl', 'c') # Press the Ctrl-C hotkey combination.
pyautogui.alert('This is the message to display.') # Make an alert box appear and pause the program until OK is clicked.
pyautogui.locateOnScreen('looksLikeThis.png') # 图像识别,返回坐标值
pyautogui.locateOnScreen('looksLikeThis.png', confidence=0.9) # 用到opencv进行图像识别,匹配相似度90%
```
### 常见问题
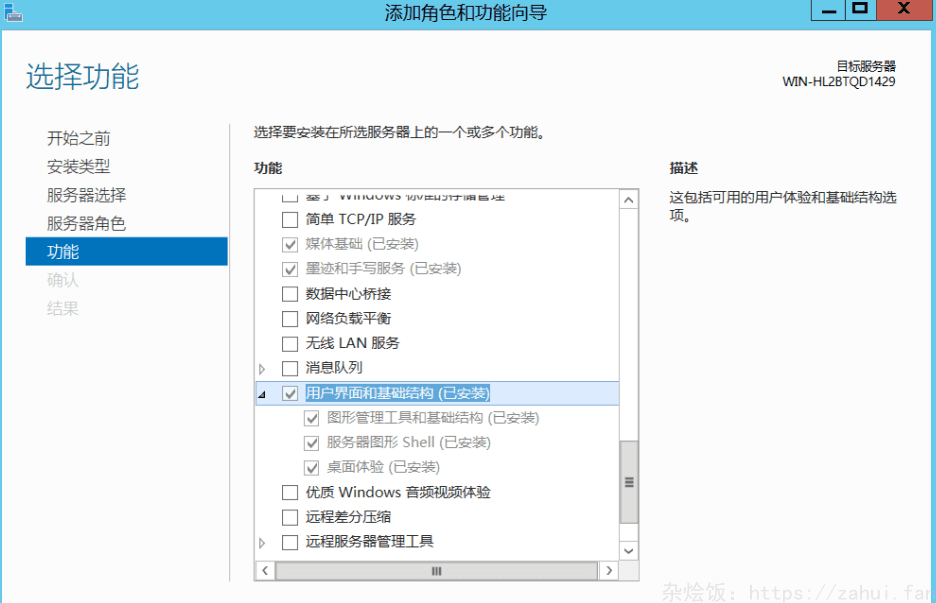
在 win server 中, 可能会出现明明已经安装了 opencv-python 但是却报错: `NotImplementedError: The confidence keyword argument is only available if OpenCV` , 你需要安装 桌面体验 功能: